Because (surprise surpise) I hate working on small repetitive tasks, especially ones I have to juggle tabs for.
If your daily routine is managing a calendar and booking appointments, it's time you delegate it to an AI slave assistant.
(Skippable Intro..)
I manage appointments for multiple people (I'm in the medical/staffing field), and I do it all on my personal computer. The event details are typically announced in our group chat, so I often have to switch from whatever I was doing to Google Calendar and manually input them.
In addition, some appointments require booking a Dial-A-Lift ride, which is usually done over the phone.
That all changed when I discovered that rides could be booked via Gmail. After following this routine for the past couple of months, I realized I had all the ingredients to build a bot that could centralize the process.
My First Workflow
What it is and what it does
- Main Workflow: Create, List, Update and Delete events on my calendar
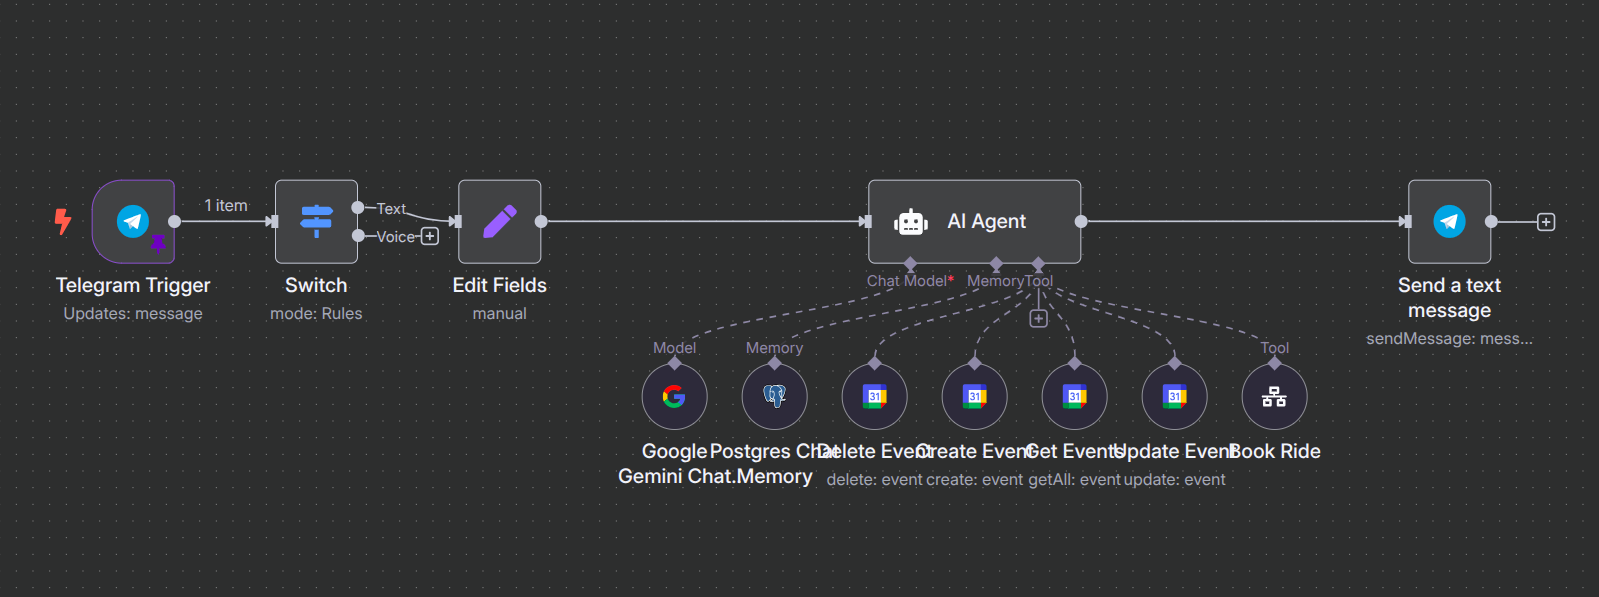
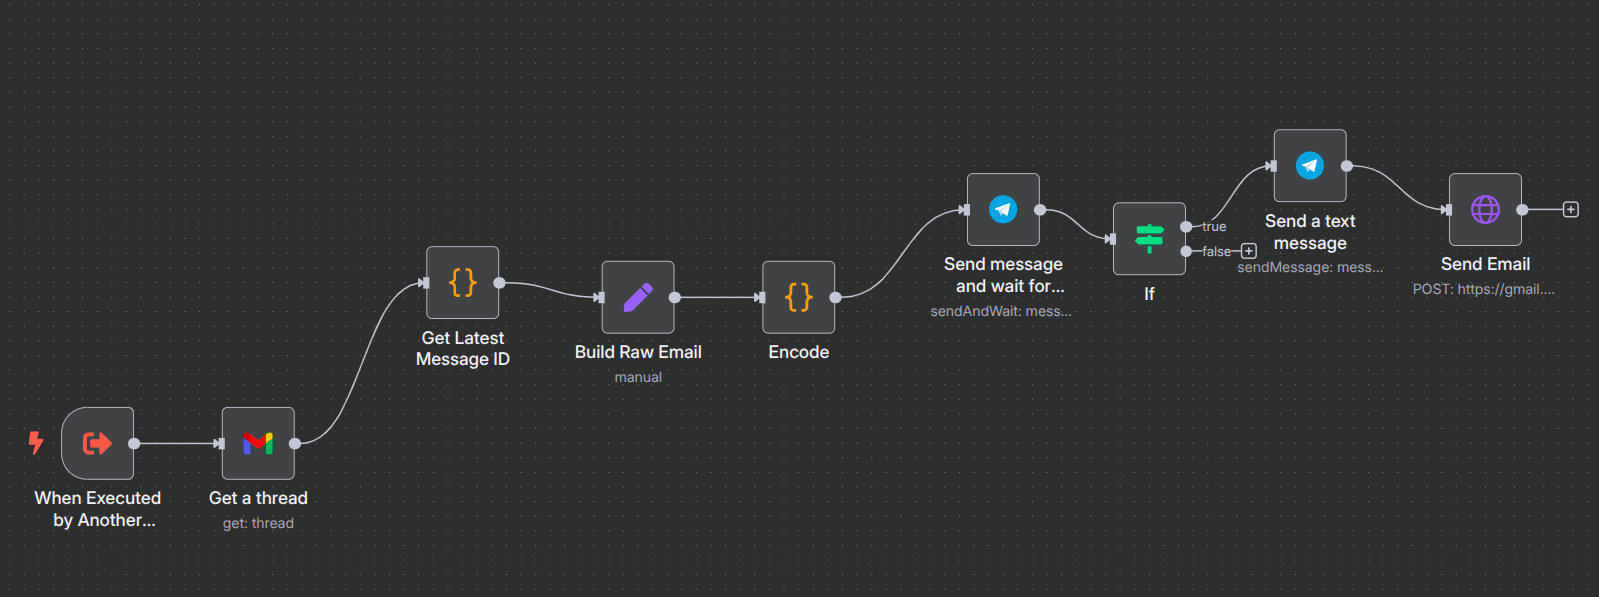
2. Sub-workflow: Send emails on my behalf by replying to a message thread.
Setting up and tools
Creating OAuth Client ID on Google Cloud Console
Since we're using Gmail and Google Calendar as tools, you'll need an OAuth client ID for authorization. There's a bunch of tutorials like this that can help. If you're self-hosting, make sure that you use https urls only when setting up OAuth 2.0 Client IDs. This allows you to set the publishing status of your project from Testing to Production, ultimately avoiding the token expiration.
Gemini 2.5 Flash Model (Free)
- Sign up on Google AI Studio, select your preferred model then get an API Key. I use Google 2.5 Flash free tier set to a temperature of 1.
- I have not done much research in terms of limits. For reference the most tokens I've used in a day is 305.9k and most request I've made is 15 (I was debugging and testing)
Craft a Prompt for your AI Agent node's "system message"
What to include:
- ROLE
- TOOLS
- FORMAT RULES
- FINAL NOTES
Here's a snippet of my prompt:
TOOLS
## Tools
Use "Book Ride" to send an email for booking rides.
Use "Create Event" for creating events or appointments
Use "Get Events" to list or find an event and its details on calendar when requested.
Use "Delete Event" to delete an event. You must use "Get Events" first.
Use "Update Event" to update event details. You must use "Get Events" first. If you cannot update, Use "Delete Event" and then create a new event using "Create Event"
FORMAT RULES
### Rules
- Turn the incoming query into an action. Ignore clarification questions, just take action based on the intent you receive. Always use "Get Events" and never ask for event ID.
- You must format events this way when using "Get events": Event title /n, date/n start time and end time /n, and description.
- You must put line breaks if there are multiple events.
- In sending or drafing email always start with "Hello, may we kindly request transportation for the following event? Pickup will be from (some address here). /n/n"
The formatting depends on how you want it to look. Thus, you have to really be specific with what you want it to do to avoid hallucinations. Some models like OpenAI's GPT4 support the structured output parser. It acts as a formatter for your AI's response, and can be activated by switching the "Require Specific Output Format" tab on your AI Agent node. (I did not know this)
Telegram Bot
To send/receive messages I use a Telegram bot, created through BotFather. It'll also give the token needed for Telegram credentials once you're done creating the new bot.
The Telegam node will have a chat ID parameter used to identify which user it'll be sending messages to. It can be found through Get ID Bot
(Side Story: I once had a friend test my bot. He asked me what would happen if he spammed it with messages) To prevent other people from interacting with your bot- go to your Telegram trigger node, and under Additional Fields, add a "Restrict to User IDs" parameter. Input your chat ID or chat IDs you want it to be receiving messages from.
Postgresql Memory
You can connect a Simple Memory node on your AI agent's memory connection in order for it to "remember" your conversation. However, only do this for testing purposes because it uses your machine's memory- causing it to crash. Since I already use Supabase for all my other projects, I use Postgres Chat Memory node. I recommend you guys do too, since it's (1) easy to set up and (2) they're pretty lenient with their free plan.
Once the Supabase project's already been set-up, go to your project and click on Connect located at the nav bar. In order to to create a credential for the Postgres Memory node, you'll need to copy each field under View Parameters of Transaction Pooler section of Connect dialog, then paste them on their respective fields on Postgres credentials dialog.
Some of you may encounter may encounter this issue: Supsabase SASL: SCRAM-SERVER-FINAL-MESSAGE: server signature is missing but as pointed out by thomlov, remove all special characters from your password, and it did the trick for me.
Conclusion
About 30% of my work can now be handled remotely through the bot. No more switching tabs or getting sidetracked. In the beginning, you’ll need to play detective on the execution tab to catch and fix errors, but once it’s dialed in, it runs mostly on its own. I’ve shared the tools I used and lessons I picked up along the way. In Part 2, I’ll cover the sub-workflow that handles email replies.